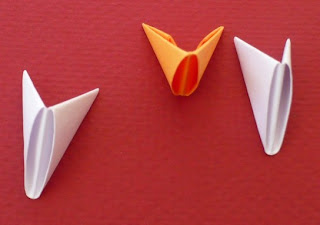
Welcome to my second part of the origami tutorial. Today we are going to make the 5 points bowl that I posted last week. If this is you first time visiting and you are interested in making one of the origami projects that I had posted, you'll need to scroll down to see the tutorial on how to make this unit. You will need to make 225 units to make the 5 points bowl.
Please ignore the big space between pictures. I am still learning to use this blogger site. Adding multiple pictures always give me a hard time. The pictures kept on disappeared when I tried to make the space closer. Any suggestion?
Let's get back to the tutorial.
See the black spot on the white unit in the first picture? That was how much glue I applied on both wings before I inserted into the pocket.
I am using three colors (white, orange, and yellow) so it will be easy for you to see.
The first row is white. The second row is orange.
We will be making two rows at the same time. So if you are using one color you will need 60 units. Separate them into two groups so you don't have to keep counting how many unit you have joined.
Step 1: Take three units. Apply glue on each wing that need to be inserted into the pocket. (Note: the longest size of the white units are facing down and the orange unit longest size is facing up.)
Push the first row (white) all the way into the second row (orange).

It should look like the third picture.
Keep inserting in the same pattern. Do not forget to apply glue on the wings of the first row.
I am missing one shot here. But I hope you'll still able to continue. The shot that I missed had three oranges and two whites with one pocket left on each end.
I am missing one shot here. But I hope you'll still able to continue. The shot that I missed had three oranges and two whites with one pocket left on each end.

Once you have joined all the 60 units together, (30 for first row and 30 for second row) on one end it should look like this fourth picture. One empty pocket.
Insert the wing into the pocket to complete the circle.
Step 2: Third row. I am using yellow. Look at the picture carefully. See the two orange units? I inserted each yellow pocket into each of the orange wing. I also turned the yellow unit opposite the orange unit. That is how you are going to join the unit from this row on.
The third row units should line up with the first row units. Push the third row all the way in. Shape the bowl by bringing the end up. See the next picture.


Here is the picture of third row completed.
Are you with me so far?

Step 3: Row four (orange.) The fourth row units should line up with the second row units. (Refer to picture 7th how to insert)
Keep shaping the bowl by bringing up the tip.
After finished the fourth row, add the fifth row. The fifth row units should line up with the third row and the first row.
You are assembling the bowl in the same two patterns. Refer to the 3rd picture and the 7th picture.
(Do not forget to add glue to the tip.

Step 4: Row six. This is where you'll make the 5 points. Insert 5 units and skip two wings. Make sure you do not skip one whole unit. (Look at the picture) Row six should line up with row 4 and row 2.
You should have five point bases.

Step 5: Row seven. Insert only four units on each point. One wing is left on each size.

Step 6: Row eight. Insert only three units on each point. There should be one wing left on both size.
Step 7: Row nine. Insert only two units on each point.

Step 8: Row 10 (last row) Insert only one unit on each point.
Give yourself a pat on the back. You did it! :)
You can use these units to make many things such as: a vase, a shoe, many different animals, and even flowers.

Hint: If your bowl curve in too much, gently pull the bowl open. If your bowl is not curve enough, gently press the bowl in with your hand.
Won't it make a nice Christmas gift with this bowl and some goodies in it?
I hope you enjoy making this 5 points bowl. If you have any question, leave me a comment or email me.
Stay tune for a much simpler project using these units.
Thank you for visiting. Happy Labor Day!
Helen


2 comments:
Wow!
Great tutorial! Your skill in working with the origami is awesome!
Thank you for sharing! Wishing you a great day!
Barbara Diane
I just found your blog through a link from Paper Friendly. I have always wanted to try 3D origami and your instructions seem so easy to follow. Can't wait to sit down and fold some (okay maybe alot) paper!
Post a Comment