Showing posts with label TopNotes. Show all posts

Monday, March 17, 2014

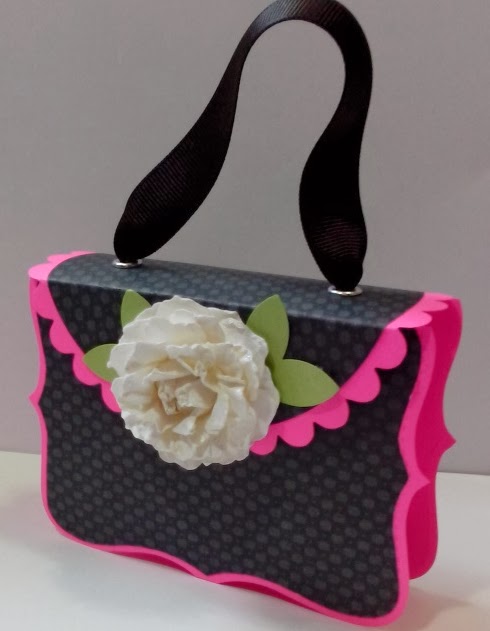
TopNote Purses The Other Way

Hello,

What a roller coaster temperature we had in the past a few days.  Saturday the temperature was in the mid 60, then Sunday it went down to 40.  This morning we woke up with 3 inches of snow and it is still snowing. Crazy weather! O.k enough of the boring winter weather.

 I saw this on google search and absolutely love it so I gave it a try.


They are so pretty. I love all three colors. 

Here is my craft show sharing from Saturday.  As I mentioned at my last post, I normally don't do craft show in March because some people were probably just paid off their bills from Christmas shopping. :)   People buy things only if they can use it or give it as a gift.  It is March so I didn't expect much.   As always I set my goal; it was between $100 - $150.  I sold $115 and Faye sold $11 of her Rainbow Loom charms.   I will go back there in November to give it another try.  I love the spot that they gave me.

Until next time

Helen

Friday, March 14, 2014

Top Note Purses/Craft Show

Hello,

I had wanted to make this Top Note purses for years.  I finally made them and of course I couldn't just make one.


Tutorial here.

Here is for local readers. 
 Interboro High School Craft Show
 Saturday, March 15, 2014 - 9AM - 3PM
16th & Amosland Road, Prospect Park

I will be inside Cafeteria. Hope to see some of you there.

Helen


Thursday, October 20, 2011

Snowman TopNote Box

Hello Bloggers!

Just dropping in to share this cute TopNote snowman box that I saw here


Thanks for your visit! Have a wonderful weekend.  I will return next Monday.

Cheer!

Helen

Wednesday, May 26, 2010

Top Note Purses

Hello,
I am still working with the remaining 80 mini treats.  A few weeks ago, I had an entire day to myself.  Ah, it was so nice and quite.  The thing was  I didn't know what to do so I tested out my new toy, scor-pal. I finally decided to buy one. Look what I made in a little over 3 hours.  I should have bought it a long time ago.

I made 24 Top Note purses.


You were thinking that was all I could make!  No, I didn't just make 24 purses.  I cut, scored, and assembled 70 small bags that I used for the purses.  I was looking for small bags that would fit between the two Top Notes in many places but could not fine it, so I made them.

If you are interested in making the small bag, here is how: 4 1/4 x 11 1/2.  I used the 20 lbs. printing papers.  I bought the papers from Office Depot and they had different length.  Came in a pack of 500 sheets.  Mind was 8 1/2" x 14 " perfect for this type of craft.  After I made these bags, I went to Michale's Art and Craft and found out that they carried the bags  that I had been looking for and it was the #1 size bags.  Any way, you can get the bags from Michale's or make them yourself. 

4 1/4" x 11 1/2" Score at 3 1/2, 5 1/2, 9 and 11

Turn and score at 2 1/2

Cut like shown in the picture below.


Assemble the bag by first apply adhesive on the 1/2 inch flab.  Then assemble the bottom of the bag and you should have this.


If you are using liquid adhesive  which I did, you will need to wait until the glue is completely dried before proceeding to the next step.

 Once the glue had dried, pinch the opening (top) of the bag like in the picture.

Then flatten the bottom.


Sandwich the bag between two Top Note dies (trim the two Top Notes 1" off before sandwiching the bag).


For the purse cover, make two score lines about 1/8" from the center.  See picture.
This is the old purse.  I only made 1 score line right in the center of the Top Note.  It was difficult to close when I put chocolates in the purse.


The newer version was much better.

Thanks for stopping by.  It's going to be another beautiful day!

Helen

Tuesday, March 23, 2010

Crochet flowers TopNote boxes

Good Morning,
Can you tell I am a fan of boxes!  I have two boxes to share today.  I had almost forgotten about my crochet flowers so I thought it's time to use them again.  The papers are from DCVW the premium stack, love them!


  Pat (Hi Pat) is going to use the box to hold chocolates so I thought this "enjoy" on the inside lid would get a kick!


I tended to make two of everything.  This pink one is the same as the blue.  I forgot to take the picture of the inside.

I am glad you've stopped by again today.  Have a lovely day!

Helen

Wednesday, March 10, 2010

Cottage Wall Easel Card Box

Good Morning Everyone!

The easel card are so popular and so pretty  for showcasing the art work.  I had to make one also.  I've seen lots  of easel cards and easel card box but I haven't seen one using the top note yet, but it doesn't mean it's not out there.  Here is my easel card and box.

 Underneath the easel card is the match box.  You can find the tutorial to make the match box here.  Isn't this make a great gift? 


 I hope you've enjoyed today post.  Thank you for visiting.  Have a great day!

Helen

P. S.
Here is the punch that I used to make the mini roses.  It's the medium flower punch.


I followed this tutorial here, but I also added a little bit of my own touch.  Any question, I love to hear from you.

Helen

Tuesday, March 9, 2010

Mini Roses Top Note Box


Hello,                                                                                                                                                     Look at what I've made when I couldn't sleep!  I used to read when I couldn't sleep at night.  Now, this is what I made when I couldn't sleep, roses.  When I didn't know what to do or couldn't create anything during the day, I would just punch out flowers from scraps and store them in the container so I can make different flowers when I needed one.  I've made much more mini roses than in this picture.  I used some before I realized to take the picture.


I really like the pizza box style and the top note die cut.  They both are a pair.  Here is my  pizza box with the mini roses.  I used Stampin' Up! Summer Sun card stock for the box.  I thought it was more orange than the yellow sun.  I sponged the mini roses with Stampin' Up! Summer Sun classic ink.  The ink was lighter then the card stock.  I also added glitters on the roses.


Here is the side view.


The box open up the long way.  I didn't really like it.


So I made another box.  For these roses, I sponged Pumpkin Pie classic ink. 


I still wasn't very happy with the result.  But I added goodies in the box any way.  What is better than these chocolate nuggets? Yum!


Thank you so much for visiting!  Have a wonderful day!  It's going to be another beautiful day here in the Delaware Valley.

Helen

Monday, March 1, 2010

Another TopNote Dresser

Good Morning,

This is the same post from two weeks ago.  Somehow I published this post.  It meant to be for today.  So here it is.
A few people requested me to do  this TopNote Dresser tutorial.  It is quite simple to make this TopNote dresser. I got this adorable box design from cleaning up my mess.  Isn't it great to make a mess sometime?

 
The bottom two draws are match boxes  style and the top one is the pizza box style.
 
Here is the measurement for the pizza box: 6 x 9 1/16. 
(Note: this picture is not a printable template.) 

Score on the 6" size - 1" from each end. 

Score on the 9 1/16" @ 1, 4, 5, 8 1/16 (Note: from 5" score line to 8 1/16" score is 3 1/16" big, this will be the lid for the pizza box. This will allow the pizza box to close nicely).
 

This is the match box measurement: 7 x 8 card stock or pattern paper
On the 7" size score @ 1, 2, 5, and 6
On the 8" size score @ 1, 2, 6, and 7
Cut off where I marked with the "X" or three of the squares on the corner.
  

Two bands for the match boxes, each measure 3 x 11
Score @ 4 1/8, 5 1/4, 9 3/8, and 10 1/2
                                              

                                          Here I marked "L" for the lid and "B" for the box base on the pizza box.

                                                 Decorate all your pieces before assemble them.


                                              This is the pizza box piece. I forgot to take the shot with the brads. You should at this point add the embellishment.  Then you can assemble the box.
                                                                
                             These are the match box pieces. Again, add the brads before assembling   the boxes.

 
 This is the band for the match box.  You should have two of them.
  
Wrap the band around the match box so it will fit properly.
  

Next, you will need 4 TopNote pieces.  
You will adhere two of the top notes pieces to one of the match box.  
The other two top note pieces, you will adhere them to the pizza box.
You should have three pieces that look like this.


 Now you are going to stack them together. 
Take the middle match box , without the top note, and apply adhesive.  I used liquid adhesive so that I can center it easily.


Then apply adhesive on the match box and place the pizza box on top of that.  Ta! da! you are done!

Decorate the top draw/dresser anyway you like.

Here are two more.


Hope you've enjoyed today tutorial.  You are welcome to case this.  A link back to my blog is greatly appreciated.

Note: if you use all designer papers, it's very quick to make this project. I had used non SU pattern papers and it took no time at all but it didn't come out as nice. I would love to see what you came up with.

Thank you for visiting.  Have a great day!

Helen

Monday, November 30, 2009

TopNote Purses

Good Morning!

Aren't these purses adorable?  I bought a few small paper bags a while ago just because they were clearance.  I was about to get rid of them went a light bold went up and I got these adorable purses.
 The stamp image was from this year Sale-A-bration.  The flower was from punches that I layered and hold them together with a brad in the center.
 
 The two purses with no sentiment at the bottom picture, I used the faux leather technique. Aren't they cute?  I cut the small paper bag to fit the TopNote purse.  So what did I do with the other half?
 
 
Here is what I did.
I folded 1" up and crease really good. 
Sorry about the flash.  I took these pictures at 10:30 PM.


Then opened the bag and cut on the four corners like shown.
 
 Apply adhesive on the two small pieces and along the edge of one of the longer piece.
 
 Turn the bag over and use something to press the bottom to shell it off.  That's another bag and it fit the TopNote purse!
 
 Thanks for visiting.  Have a great day!

Helen