Showing posts with label Quilling. Show all posts
Showing posts with label Quilling. Show all posts
Thursday, August 6, 2015


Monday, December 10, 2012
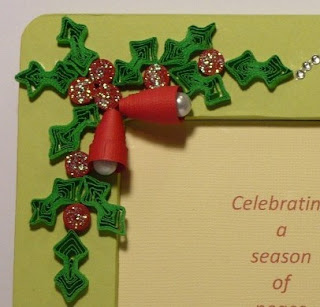
Christmas Quilling Photo Frames
Hello,
I have a few Christmas Quilling frames to share. I made these for last week craft shows. I added the Christmas greeting hoping to attract attention. I was wrong! People thought it was a Christmas greeting frame instead of a photo frame. I made 5 of these. I sold 2 one at each show.


I will have more craft show sharing next week.
Helen
I have a few Christmas Quilling frames to share. I made these for last week craft shows. I added the Christmas greeting hoping to attract attention. I was wrong! People thought it was a Christmas greeting frame instead of a photo frame. I made 5 of these. I sold 2 one at each show.


Helen
Monday, October 29, 2012
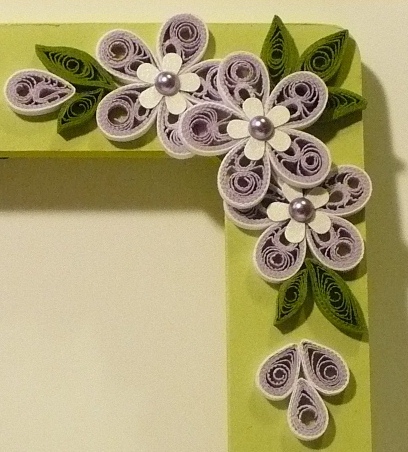
Altered Quilling Flowers Frame
Hello,
I had some left over quilling flowers from a while ago and the last time I went to craft show one customer suggested that I made a frame with this color combination, light purple and celery. I like how it turned out.


My heart goes to those who are affected by the hurricane Sandy. I hope you and your families are safe.
Helen
I had some left over quilling flowers from a while ago and the last time I went to craft show one customer suggested that I made a frame with this color combination, light purple and celery. I like how it turned out.

I thought this card worth sharing. My daughter made this card for her classmate birthday. She started to use the circle sizer so her flower petals are more even now. Look she also added white border on the flowers.

Helen
Monday, May 21, 2012
Decorated Foam Board Quilling Wedding Photo Frame
Hello,
I love to decorate photo frame with just one color. It is easy yet the result is outstanding, well, at least for me.


 Let me give credit where its belong. I learned how to do the multiple scrolls from Susan quilling. Susan created the most elegant quilling. The bell like flowers were inspired from Neli. And the flower tutorial was from Lin Handmade Greeting Cards.
Challenge
Make It Monday - anything goes
Thanks for looking!
Helen
I love to decorate photo frame with just one color. It is easy yet the result is outstanding, well, at least for me.


Challenge
Make It Monday - anything goes
Thanks for looking!
Helen
Monday, April 23, 2012
Decorated Foam Board Photo Frame
Hello,
First, I wanted to thanks Jessica Jones over at How About Orange for feature the origami paper bow tutorial that I shared last year HERE. That page right now has more than 23 thousand views. Last Friday when Jessica featured my tutorial on her blog I had over 14, 000 visitors in one day. HOLLY COW! Thank you so much for sending your readers to my blog, Jessica!
O.k. on to my today project. If you are my regular blog readers, you knew I love to decorate photo frames because they make great gift!
I had been trying to make my own photo frame but I didn't know what material to use. I was thinking of using wood but cutting wood and sanding wood are a bit messy. Then I was thinking of using cereal box but they are too thin. I was drooling over the decorated quilling frames that Lin at Lin Handmade Greeting Card made. And that inspired me to think harder. Then I got an idea. How about foam board? I tried it and it work!
The foam board I used was 3/16 inch thick. Micheal's had a sell last week for 99 cents each. Of course I grabbed a few sheets.
For this frame I cut it 8 x 10 so one sheet of foam board will give me 6 frames. This frame fit 4 x 6 inches picture. I took pictures for the tutorial but all the pictures came out badly so I had to make another frame and will do the tutorial then. So stay tune!


Here are two more decorated frames using wooden frame from Micheal's.


Challenges:
LoveToCreateChallenge - anything goes
Make It Monday - anything goes
Thanks for stopping by again.
Helen
Monday, November 14, 2011
Elegant Altered Quilling Frame
Hello Bloggers!
I haven't forgotten about you my blogger friends. I just don't have time to spare. Between 3 young kids, their school work, house work, my part time job, and my craft shows, I have no time left to browse the web. So bare with me I will visit you wonderful blogs when I am done with my craft shows. I only have a few more to do. :)
Here is today sharing.

Please excuse the not so good photo. I haven't take a single decent photo lately. I don't know if it was me or I need a new camera.
I'm entering this to
Make it Monday
Thanks for looking. Have a fantastic week!
I haven't forgotten about you my blogger friends. I just don't have time to spare. Between 3 young kids, their school work, house work, my part time job, and my craft shows, I have no time left to browse the web. So bare with me I will visit you wonderful blogs when I am done with my craft shows. I only have a few more to do. :)
Here is today sharing.

Please excuse the not so good photo. I haven't take a single decent photo lately. I don't know if it was me or I need a new camera.
I'm entering this to
Make it Monday
Thanks for looking. Have a fantastic week!
Friday, July 29, 2011
Quill Butterflies
Hello,
I had a hard time making these kind of quilling butterflies at first. But I was determined to learn and then they were not so hard any more because...... look at the butterflies that I've made.


I made more than these. I used some of them on my cards.
Always a pleasure to have you stopped by my blog.
I am off to the Valley Forge scrap booking convention now, Yay!!!
Have a wonderful weekend!
Helen
I had a hard time making these kind of quilling butterflies at first. But I was determined to learn and then they were not so hard any more because...... look at the butterflies that I've made.
I made more than these. I used some of them on my cards.
Always a pleasure to have you stopped by my blog.
I am off to the Valley Forge scrap booking convention now, Yay!!!
Have a wonderful weekend!
Helen
Monday, March 7, 2011
Quilled China
Good Morning,
My first try at 3D quilling. I bought miniatures quilling book a while ago. I decided to try the China set first. Just in case you couldn't tell what these item are: two plates, two cups, two saucers, a bowl, and a complote. I never heard of "compote" before so I have no idea what it is for.

A flower pot. The flower pot is sitting on the quarter. I made five small flowers from the Cuttlebug quilling kit (quilling die cut) for the flower pot.


It was difficult! I guessed it was because I wasn't in the quilling mood. Also, I followed the instruction. When it came to following instruction, I am not so great at it. I will have to give this another try. So stay tune.
Thanks for looking.
Helen
My first try at 3D quilling. I bought miniatures quilling book a while ago. I decided to try the China set first. Just in case you couldn't tell what these item are: two plates, two cups, two saucers, a bowl, and a complote. I never heard of "compote" before so I have no idea what it is for.

A flower pot. The flower pot is sitting on the quarter. I made five small flowers from the Cuttlebug quilling kit (quilling die cut) for the flower pot.

It was difficult! I guessed it was because I wasn't in the quilling mood. Also, I followed the instruction. When it came to following instruction, I am not so great at it. I will have to give this another try. So stay tune.
Thanks for looking.
Helen
Monday, January 3, 2011
Quilling Snowflakes
Good Afternoon Everyone!
I hope everyone had a wonderful holiday and the new year will bring lots of happiness and good health.
I made these quilling snowflakes last year. They weren't so nice. A friend was looking for unique Christmas gifts for her children so I remade these quilling snowflakes for her. The 1/8" strips made beautiful and elegant snowflakes but the snowflakes were not sturdy. So I cut 1/4" strips from regular printing papers. I was surprised how nice they turned out. Sorry for the poor pictures quality. There were times it was impossible to take good picture and this was one of that time.


These quilling snowflakes are not my design. If you google "quilling snowflakes", there were lots of them for you to choose. These snowflakes were a little crocked because I didn't use the grid. Somehow I didn't have patient for these snowflakes. Maybe due to cutting my own paper strips.
It's so great to be back to blogging again.
Have a wonderful day!
Helen
I hope everyone had a wonderful holiday and the new year will bring lots of happiness and good health.
I made these quilling snowflakes last year. They weren't so nice. A friend was looking for unique Christmas gifts for her children so I remade these quilling snowflakes for her. The 1/8" strips made beautiful and elegant snowflakes but the snowflakes were not sturdy. So I cut 1/4" strips from regular printing papers. I was surprised how nice they turned out. Sorry for the poor pictures quality. There were times it was impossible to take good picture and this was one of that time.
These quilling snowflakes are not my design. If you google "quilling snowflakes", there were lots of them for you to choose. These snowflakes were a little crocked because I didn't use the grid. Somehow I didn't have patient for these snowflakes. Maybe due to cutting my own paper strips.
It's so great to be back to blogging again.
Have a wonderful day!
Helen
Monday, August 9, 2010
Pat's Birthday gift
Good Morning,
I loved the box that I made for Patti Lee so I made another one. This one is in purple because my friend Pat's favorite color is purple. This is for Pat's birthday.

I always made six petals flower because it is easier to do a six petals flower then a five petals flower at least for me. So for this box I made the flower with only 5 petals. The box is smaller than the last one I made for Patti Lee. I used only two match boxes and I glued them the long way.
 Here are the inside. A pair of quilling earring and a matching necklace.

Here is a closer look at the quilling jewelry.

The circles that I used are called eccentric. It is a lot prettier than the lose coil. Here is how I made them.
I used two pins for each coil. One pin to hold the coil in place and the other pin was to move the center to the side and add a tiny bit of glue and pin it in place. Wait until the glue dry about 15-20 or less.

Then take them out and pinched them on one side to make tear drop shape. I didn't need grid paper when I made the six petals flower. I learned this trick from quillingMagic. Using the punch for the flower was a great help!


I loved the box that I made for Patti Lee so I made another one. This one is in purple because my friend Pat's favorite color is purple. This is for Pat's birthday.

I always made six petals flower because it is easier to do a six petals flower then a five petals flower at least for me. So for this box I made the flower with only 5 petals. The box is smaller than the last one I made for Patti Lee. I used only two match boxes and I glued them the long way.


Here is a closer look at the quilling jewelry.

The circles that I used are called eccentric. It is a lot prettier than the lose coil. Here is how I made them.
I used two pins for each coil. One pin to hold the coil in place and the other pin was to move the center to the side and add a tiny bit of glue and pin it in place. Wait until the glue dry about 15-20 or less.

Then take them out and pinched them on one side to make tear drop shape. I didn't need grid paper when I made the six petals flower. I learned this trick from quillingMagic. Using the punch for the flower was a great help!


I hope you've enjoyed today post.
Have a lovely day!
Helen
Thursday, July 8, 2010
Patti Lee Birthday gifts and The Winner
Good Morning Everyone!
Wow, three weeks had just gone by in a flash! Thank you everyone for playing along and for your lovely comments. I enjoy reading all of them. Thank you so much also to my new followers. The three digit numbers sure look great!
I wish I could send everyone something ......but the winner of my first blog candy goes to - Lauren
Lauren said:
WOW - this is awesome candy! I absolutely LOVE the quilled earrings & necklace! Your work is AMAZING! I have just become a follower.
Lauren
Lauren please email me your address. You have 24 hours.
It had been a great year! Thank you so much everyone for stopping by to see my creations. I am looking forward to another great year. But I can't do it myself, I hope you will continue to visit my blog for inspiration.
O.K let's get back to posting. During my absent from blog land. I had made a few things. I made these for Patti Lee. Her blog Creations by Patti. Now that Patti received the card and the quilling jewelry I can share them here. Patti also had these items on her blog. She took some great pictures of these items too.
 The long tiny pieces next to the card are the handmade buttons. I decided to leave the tails on and they can be used as brad. I can't wait to see what Patti will use them for.

Here is the inside of the card. I messed up the inside sentiment. So instead of tossed the card, I stamped the same sentiment again on a piece of scrap and mounted it on another scrap and viola! you can't see the mistake now.
Here is the box I made to hold the items.

Here is the inside of the box. I made the quilling earrings and a matching necklace. I also added a red rose ring but forgot to take the picture. The earrings are so comfortable to wear.I think the necklace need to wear with a high neck shirt.

Thank you for stopping by. Have a wonderful day!
Helen
Wow, three weeks had just gone by in a flash! Thank you everyone for playing along and for your lovely comments. I enjoy reading all of them. Thank you so much also to my new followers. The three digit numbers sure look great!
I wish I could send everyone something ......but the winner of my first blog candy goes to - Lauren
Lauren said:
WOW - this is awesome candy! I absolutely LOVE the quilled earrings & necklace! Your work is AMAZING! I have just become a follower.
Lauren
Lauren please email me your address. You have 24 hours.
It had been a great year! Thank you so much everyone for stopping by to see my creations. I am looking forward to another great year. But I can't do it myself, I hope you will continue to visit my blog for inspiration.
O.K let's get back to posting. During my absent from blog land. I had made a few things. I made these for Patti Lee. Her blog Creations by Patti. Now that Patti received the card and the quilling jewelry I can share them here. Patti also had these items on her blog. She took some great pictures of these items too.


Here is the inside of the card. I messed up the inside sentiment. So instead of tossed the card, I stamped the same sentiment again on a piece of scrap and mounted it on another scrap and viola! you can't see the mistake now.
Here is the box I made to hold the items.

Here is the inside of the box. I made the quilling earrings and a matching necklace. I also added a red rose ring but forgot to take the picture. The earrings are so comfortable to wear.I think the necklace need to wear with a high neck shirt.

Thank you for stopping by. Have a wonderful day!
Helen
Friday, June 18, 2010
Orchid Opulence Birthday Card
Greeting Everyone,
I can't believe the children are out of school and summer is only a few days away! And talking of summer, there is a challenge at Pals Paper Arts. I made this card for a friend and thought I will enter the Pals Paper Arts challenge. Their theme is Summer.

Doesn't this card say summer to you! I really like how this card turns out and I hope the recipient likes it. I don't know her favorite color so hopefully she doesn't mind this colors combo.
Card stocks are Orchid Opulence and Basic black. The mini roses were from my stash that I made not long ago.
Thanks for taking a peak! Have a great weekend!
Helen
I can't believe the children are out of school and summer is only a few days away! And talking of summer, there is a challenge at Pals Paper Arts. I made this card for a friend and thought I will enter the Pals Paper Arts challenge. Their theme is Summer.

Doesn't this card say summer to you! I really like how this card turns out and I hope the recipient likes it. I don't know her favorite color so hopefully she doesn't mind this colors combo.
Card stocks are Orchid Opulence and Basic black. The mini roses were from my stash that I made not long ago.
Thanks for taking a peak! Have a great weekend!
Helen
Tuesday, May 18, 2010
Quilling Jewelry
Good Morning,
I am still working on my other baby shower items. I got a little less than half done. I wanted to share what I've made before the baby shower order. I was having so much fun making these.
I saw these quilling jewelry on Etsy and had to make one right a way.

The earrings and the pendent just used simple teardrop shapes but they turned out quite pretty. I added half back pearls in the center of the flower.
After making the red and black set, I was ready for another set. So I made these.

I CAS the pendent but I changed the earrings design.
Here is the link to Etsy quilling jewelry.
Thank you for visiting.
Helen
I am still working on my other baby shower items. I got a little less than half done. I wanted to share what I've made before the baby shower order. I was having so much fun making these.
I saw these quilling jewelry on Etsy and had to make one right a way.

The earrings and the pendent just used simple teardrop shapes but they turned out quite pretty. I added half back pearls in the center of the flower.
After making the red and black set, I was ready for another set. So I made these.

I CAS the pendent but I changed the earrings design.
Here is the link to Etsy quilling jewelry.
Thank you for visiting.
Helen
Thursday, May 13, 2010
Quilling Phrase # 4
Good Morning Everyone!
Finally the sun came out today. Look like it's going to be a beautiful day.Here is today cute phrase from the Quilling Elegant & Easy book.

Don't you just love the phrase! Don't you just agree! I bought this wooden frame from AC Moore. I sanded it a little and then I sponged with Creamy Caramel. The original phrase from the book was so small so I printed the phrase from the computer to fit this frame. I should make another one of this except in a much bigger prints and hang it in my living room. :)
Thank you for stopping by. Have a nice day!
Helen
Finally the sun came out today. Look like it's going to be a beautiful day.Here is today cute phrase from the Quilling Elegant & Easy book.

Don't you just love the phrase! Don't you just agree! I bought this wooden frame from AC Moore. I sanded it a little and then I sponged with Creamy Caramel. The original phrase from the book was so small so I printed the phrase from the computer to fit this frame. I should make another one of this except in a much bigger prints and hang it in my living room. :)
Thank you for stopping by. Have a nice day!
Helen
Wednesday, May 12, 2010
Quilling Cute Phraes # 2 & 3
Hello again,
Here are two more cute phrases decorated with simple quilling.
 That's why I rarely dusted my furniture. :) Just kidding!
This next one here is my favorite.

Don't you just love these phrases! They are stinking cute!
Helen
Here are two more cute phrases decorated with simple quilling.

This next one here is my favorite.

Don't you just love these phrases! They are stinking cute!
Helen
Subscribe to:
Posts (Atom)