Showing posts with label Boxes. Show all posts

Monday, December 22, 2014

Christmas Boxes

Hello,
My neighbor, Anna,  asked me to make 2 boxes for her necklaces.  As soon as I saw the necklaces, I wanted one too.  I show Anna my Kusudama.  She liked them and wanted  them for gifts; I suggested  we  trade.  She thought it was a great idea.  So I'll be getting the blue necklace in January.


Aren't they pretty? I like both of them.  May be I'll ask if she likes to trade with something else.

This will be my last post for 2014.

Wishing everyone a Merry Christmas and a Happy New Year!

Helen
  

Monday, June 16, 2014

Anniversary Candle And Box

Hello,

Here is a box I made  back in April but never got a chance to share.


Last week was hard to forget week.   I had never been so stress out. I lost appetite completely.  The one good thing happened last week was I lost at least 5 pounds. Victor lost about 10 pounds.   To make a long story short, we were dealing with out of control local borough.

Here are my questions:
 When a local government is out of control, can they be stopped? Who has power over local government?  They created laws only to benefit themselves.  How can the higher government allow this?  Many people are hurting from this local borough.    I would love to hear what everyone thinks or have any suggestion.

Until next tme

Helen


Monday, May 19, 2014

Pink Box

Hello,

 I made this pink box last week. I wanted a simple box so this was my complete box.


It looks too plain.   So I added some details on the sides and here is the box now.
I don't know what to think of it now.  I asked Faye how the box looks.  She  said she likes the plain one better.  Hmm, may be I lost my taste in crafting.

Until next time

Helen

Here is Faye thank you card for Katie.


Until next time...

Helen

Monday, May 5, 2014

We R Memories Punch Board Gift Bags

Hello Blogger Friends,

I am back to do  more paper crafts.  I made this bag with my own pattern.

It took me sometime to make it.  So when I saw the We R memories gift bag punch board on sale at Joann Fabric online I was super excited and order it right away.

When I saw how small the board is 5 1/8"w x 9" H, I knew this board won't make the bag size that I needed.
   I need lots of big bags 7"x 3" x 9".  I thought this punch board will help me make the bags  faster.  It turned out the provided templates make three small gift bags.

small- 2 5/8" w x 2" D x H ( the high is adjustable)
 medium - 3" w x 2" D x H
Large - 3 5/8" w x 2" x H

Here are the bags from smallest to biggest.  

 I put some numbers together.   It required 2 pieces of 12 x 12 patterns. I was able to make bigger bags using the punch board template. The size of the bag remained 2". 
It took me longer than I like.

 I played around with some numbers.  I made 7"w x 3" D x 9" H bag without using the punch board and it was so easy.  Here are the bags. 


These bags fold flat.   I''ll share a tutorial when I have more time.

Until next time.....

Helen

Monday, June 10, 2013

Tealight Boxes

Hello,

I was on tea light boxes making marathon.  I always sold a few of these boxes at the craft show.  I wasn't planing on making them any more (I was bore of making them) but a lady asked me to make a couple boxes so I decided to make a bunch then I don't have to make them for the rest of the year.

These are the popular colors.


I am entering this to Make It Monday - anything goes

Hope you like looking at them.
Helen


Monday, May 6, 2013

TopNote Gift Box And Craft Show


Hello,

First I would like to let my local friends know about my up coming craft show.  I will be at the Springfield hospital tomorrow May, 7th at the main lobby from 8 AM - 2 PM.  Your purchases will benefit The Friends of Springfield Hospital. 

I made a few of the top note boxes for the show.  The flowers were made using spellbinder flower dies.  It was the easiest flower I've ever made.  The flower dies came with many different sizes so all I had to do was cut the flowers, stacked them together, spritz water and crunched them.


I added a tiny flower that I made long ago to the center on this pink one.  It turned out so nice.
Thanks for looking!

Helen

Wednesday, February 6, 2013

60th Candle Box

Hello,

I made six of these for a lady.  It is a very simple box.  I used Core Destination cream color shimmery card stock and soft yellow.  I don't like using yellow but these two combinations with a touch of green turned out pretty nice.


You can find the mini rose tutorial on the side bar.  Box tutorial here.

Helen

Friday, November 30, 2012

Lovely As A Tree TopNote Box


Hello,

Here is another version of top note box.  I used the tree image from Stamping Up called Lovely As A Tree.  It was a large stamp but I only colored in one tree to use on the box.

Box tutorial HERE.

Have a wonderful weekend!

Helen

Monday, November 26, 2012

"JOY" TopNote Box

Hello Blogger Friends!

You knew I love to make boxes.  Today is another topnote box.


I like how this first box turned out, although, I don't like the small bow.   I like the "joy" with the green layer, however, that took me extra time so I made this instead.
I stamped "joy" directly on the top note and that really speed thing out.  I am going to ignore the not so good stamped "joy."  I also like the bigger bow better. 

By cutting off one side of the top note, I can cut 5 top note shapes out off 8 1/2 x 11 paper compare to the first one I can only cut 4 shapes out off 8 1/2 x 11 card stock. 

 White card stock was from Paper Trey Ink.  Love their 110 lb. thickness card stock!

Have a wonderful Monday!

Helen

Wednesday, October 17, 2012

Celebrate You Candle Box

Hello,

You know I personally  love boxes and so do other people. 


I made this candle and shared it last month.  I didn't like the plan box that was holding it before so I made this box to hold it instead.  I kept forgetting to add tissue paper in the box  before I took the picture.

Wishing you a wonderful Wednesday!

Helen

Wednesday, September 26, 2012

Christmas Ornament Boxes

Hello bloggers,

Today I wanted to share with you these 12 lovely Christmas ornament boxes.  No, I did not make them. I wish I had that kind of brain.  It is the talented Deanna at De Stampin's Corner created these lovely boxes.

Don't you just love them?  I absolutely love them all!  She has a step by step tutorial for these boxes for sale on her blog.  Check it out, you won't be disappointed.

Helen

Friday, August 17, 2012

Cream Card Box


Hello,

I enjoyed making boxes, big or small.  I wanted to make a plan boxes but when I added the flowers the boxes turned out quite lovely.  The flowers were made using medium 5 petal punch. The pearls always added a nice finish to the flowers.  You can fine the tutorial on this box here.


Have a wonderful weekend!

Helen

Thursday, May 10, 2012

Card Box Tutorial

Hello Bloggers!

I have a few more boxes to share today.  I made four more boxes on Tuesday. I have more free time now since I don't have to go to work for a while.  Yay! to that.  Now you would think it was a lot of boxes for one day.  When you duplicate the same item, it didn't take as much time at all. Plus I had all the embellishment already so each box didn't take much time at all.  I forgot to take a picture of the purple box before  I sold it.  So here are 3 of them.


I have two different ways to make  this box.

Here is the first one:

1 - 11 x 12 sturdy card stock for box

 Note to myself:  water color papers are very sturdy their thickness are up to 140 lb perfect for this project.

1 - 7 5/8 x 11 1/8 for lid

take the 11 x 12 card stock and on the 11 inch size score @ 2 1/2 and 8 1/2

see picture below

turn and score at 4 3/4 and 7 1/4


cut off  where I marked with the  "X" (1 1/4 x 6 inches)  Then fold on all score lines and make 4 cuts where indicated.  You can use die cut for that area but it will be difficult when you decorate the box later so that was why I just cut it straight.  Assemble the box. 
The finished size for this box is 2 1/2" depth x 4 3/4" tall x 6" long.


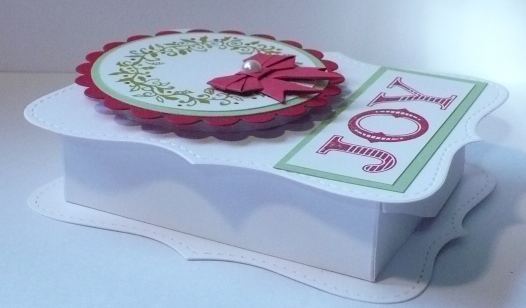
Here is another way and this was the one that I used.  The box came out very sturdy!

2 - 7 1/2 x 11 card stock for box
1 - 7 5/8 x 11 1/8 card stock for lid

take the 7 1/2 x 11 inches card stock and on the 11 inches size score at 2 1/2 & 8 1/2. see picture below

turn and score at 5 inches
make two cut
 you should have this
glue and assemble the piece and you should have this.  This will be the back of the box.  I added the word adhesive here so you know where to put glue when you join the two pieces together.  see the 4th  picture below

take the other piece and score the same measurement.  Except for this piece you will need to make
 3 cuts off where I marked with the "x".  See diagram picture
you should have this


take this piece and adhere to the other piece.  Apply adhesive where indicated and that is the box.

The lid is the same measurement for both boxes.
Take the 7 5/8 x 11 1/8 and score 2 1/2 all around.  Then make 4 cuts


Assemble the lid and decorate your box. The finished size for this box is 2 1/2" depth x 5" tall x 6" long.  I hope you will give this box a try.  The tutorial looked like lots of work but it is a very easy box to make.

Any question let me know.

Have a wonderful weekend!

Helen