Monday, April 30, 2012

4 Tiers Cake

Hello,

I mentioned last week that I made a 4 tiers cake for a rehearsal dinner.  I forgot to take the pictures before I gave them to Lynn.  However, Lynn took the pictures and sent them to me but I accidentally deleted the pictures.  I told Lynn about it and she kindly sent me again.  It was from her iphone so the pictures are different from my usual ones.

The bottom layer had 17 boxes, next were 13 boxes,  the third layer had 12 boxes and the top layer had 11 boxes.  I made 61 boxes total but not all of them were assembled on the cake.


Again, I made each cake piece looking like this.

 I started this cake boxes back in February because there were so many pieces I had to make.   It took me over 1 hour just  to cut the flowers for the roses. Then I had to make 61 origami bows in 3 different sides. After that  I had to stickle the bows  and added pearl to the bow, cut and emboss the outside of the cake boxes and I had to make 51 tags to go in the box.  You got the idea of how much work it was but I love every minute of it and I would do it all over again without hesitation.  I saw Lynn again after the rehearsal dinner and she told me that everyone love the cake!  That was a music to my ears. :)

I am entering this to:

Make It Monday - anything goes
The Paper Player - anything goes
 4 Craftychicks - No stamping

As the weather getting nicer and warmer now, I had so many things to do around the house that I had to reduce my blogging time to twice a week.  I will be posting on Monday and Thursday from now on.

Thank you so much for checking in on me again.

Helen

Thursday, April 26, 2012

Ghirardelli Purses

Hello,

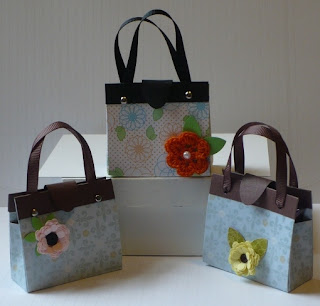
I love to make mini purses.  I made these small purses before for my friend's daughter bridal shower HERE.  I always changed my purse size to fit whatever I am going to put in there.  This time I am making the purses to hold the Ghirardelli chocolates. The chocolates are about 2 inches square each so my purses measured 2 1/2 x 2 1/4 inches.  The handles are 5 1/2 inches long.  I used grosgrain ribbon for the handle.  I tried using card stocks for the handles. I didn't like it because the handle got crashed when stacked.


The flowers were all made by me. :)

For my purses I used 5 1/2 x 5 1/2 inches and score as in the picture.

For the rest of the tutorial check here.

Thanks for looking.

Helen

Monday, April 23, 2012

Decorated Foam Board Photo Frame


Hello,

First, I wanted to thanks Jessica Jones over at How About Orange for feature the origami paper bow tutorial that I shared last year HERE.  That page right now has more than 23 thousand views.  Last Friday when Jessica featured my tutorial on her blog I had over 14, 000 visitors in one day.  HOLLY COW!  Thank you so much for sending your readers to my blog, Jessica!

O.k. on to my today project.  If you are my regular blog readers, you knew I love to decorate photo frames because they make great gift!
  I had been trying to make my own photo frame but I didn't know what material to use.  I was thinking of using wood but cutting wood and sanding wood are a bit messy. Then I was thinking of using cereal box but they are too thin.  I was drooling over the decorated quilling frames that Lin at Lin Handmade Greeting Card made.  And that inspired me to think harder.  Then I got an idea.  How about foam board?  I tried it and it work!

The foam board I used was 3/16 inch thick.  Micheal's had a sell last week for 99 cents each.  Of course I grabbed a few sheets.

For this frame I cut it 8 x 10 so one sheet of foam board will give me 6 frames.  This frame fit 4 x 6 inches picture.  I took pictures for the tutorial but all the pictures came out badly so I had to make another frame and will do the tutorial then.  So stay tune!


Here are two more decorated frames using wooden frame from Micheal's.


Lin had a great tutorial of how to make this kind of flowers here.

Challenges:

LoveToCreateChallenge - anything goes

Make It Monday - anything goes

Thanks for stopping by again.
 

Helen
Friday, April 20, 2012

Happiness Always


Hello,

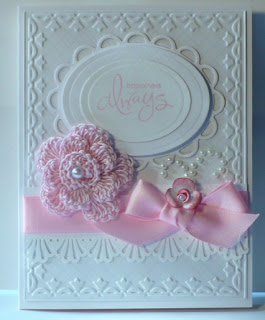
I always give a "thank you" for your order card but the card is not a thank you card. Does that make sense? I recently had two bridal shower orders.  One was the 30 tea lights and last week I just completed a 4 tier cake boxes.  I am so mad at myself for forget taking the picture before I gave the cake to Lynn. And Lynn kindly sent me the photos of the cake and I accidentally deleted her email. I felt stupid to ask her to send me the photo again.

 I made these two cards as a thank you gift for the two orders.  This one was for Lynn.


and this one was for my friend Martiza.

The card was inspired from HERE.

Thanks for looking.  Have a wonderful weekend!


Helen

Monday, April 16, 2012

Pink and Black Circle Quilling Jewelry Set

Hello,

I have a set of pink and black quiling jewelry to share today.  The earrings are very simple but I like it a lot.


Make It Monday - anything goes

Thanks for looking.

Helen

Friday, April 13, 2012

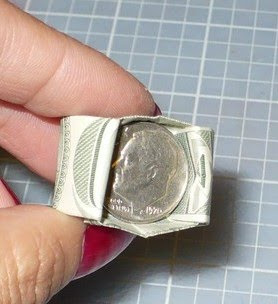
Dime-n-Ring Tutorial

Hello,

I did this tutorial before but the wording were not clear.  Therefore, I am redoing the tutorial and hopefully it will be clearer this time. 

 You will need a crisp new bill. The bank is the best place to get new crisp bills.

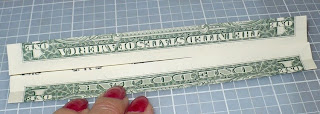
Step 1: Starting with the bill face up, fold it in half, lengthwise, crease well,  then unfold.


Step 2: Fold  the edges to the center, crease well. 

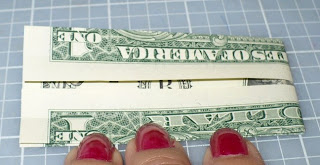
Step 3: Fold in half like shown.  Crease well
Step 4:  This is a two step folds.
              Step 4a.  Fold the corners in to the center (so it looks like a triangle) crease well and unfold.
            Step 4b. Open the triangles and push  in.  Repeat the other side.
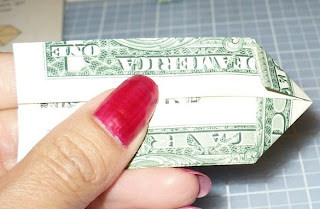
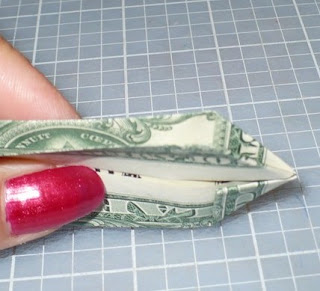
Your bill should look like this. Check to make sure there are two layers: the top layer and the bottom layer.
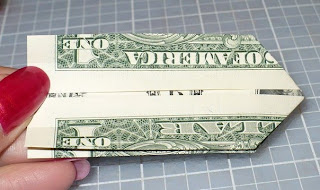
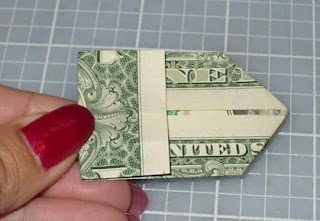
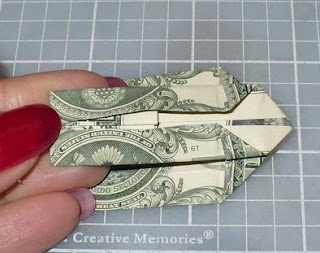
Step 5: Fold the top layer like shown in the picture.
Step 6: still working with the top layer, fold the edges in to the center,  crease well.
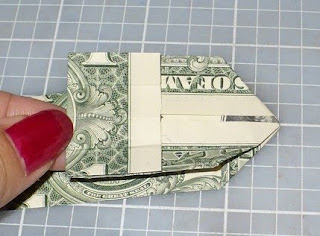
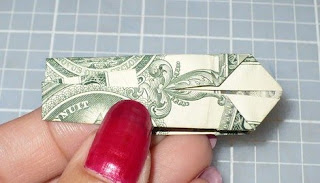
Step 7: Turn the bill over. Repeat step 5 and 6. Except when you fold the top and the bottom edges to the center, over lap the edges  (see next picture)
like this (this is to prepare for the last step)
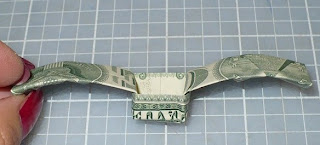
Step 8: Bring the top layer over to the right. You should have a box.  Note: if you don't have the box, go back to step 4. Make sure you did step 4 correctly.
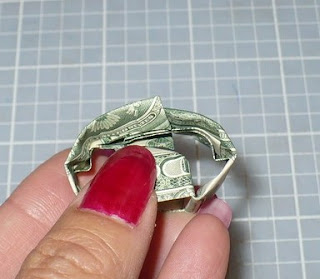
Step 9: Tuck the smaller edge into the bigger edge to form the ring band. See picture.
Finish off by place a dime in the box. If the dime doesn't fit,  place a glue dot on the box and press the dime in.
Congratulations! You've just made a dime-n-ring!

If the wording didn't make sense, try looking at the pictures.

Helen

Helen

Wednesday, April 11, 2012

Crochet Butterflies


Hello,

Recently I was away both from home and from blogging.  Every time I am away, I like to crochet because the crochet items don't get crash during traveling and packing.  Right before I left,  I stumbled upon this blog  HERE  that had a great crochet butterflies tutorial.  I was so excited because after making  500 + of crochet flowers. I need to crochet something different.  The old link is broken so I found another link HERE.

I preferred  wire and beats for the antenna.
 Here are a few more.  I thought I crocheted  much more than that.  I will be making more in different colors.

 These smaller ones are my pattern.  They are a lot faster to crochet.  I will share a tutorial soon.
 I thought I need some more small crochet flowers so here are pink and red.


 I definitely in need of white small crochet flowers so I crochet a bunch more.


Thanks for looking!

Helen

Monday, April 9, 2012

Cream Quilling Jewelry Set


Good Morning Bloggers!

I just got back home 5 AM this morning.  We are  glad to be back home and that the long driving hours  (18 hours) were behind us. There are lots washing to do but that can wait.  I need to get some traffic back to my blog. :)

 I made this before my break. 


Make It Monday - anything goes

Thanks for looking!

Helen