Friday, December 23, 2011

Money Bouquets


Hello,

After many days of thinking and searching through the web, I finally finished with the 3 money bouquets, yay! To make the long story short, here is what I have.

I found this bouquet from google that I really like

Then after many trips to Joann Fabric and Micheal's Art & Crafts, this is what I came up with.

 I know not very impressive but that was the start.  I made each flower like that then I put the 9 flowers together and this is what I had


Here is the hand tie

I made the 3 bouquets the same except I used one color for each bouquet.

Here is the gold one


Here is the red one


These are the pix (I think that what they were called) that I used for the 3 bouquets.  I got these from Micheal's art and crafts in 3 different colors.  The evergreen, not in the photo, were from my poor artificial Christmas tree that was stuck in the basement for a few years now.

The bouquets looked much better in person.  I knew I'd said that many times.  I am sure  many of you understand what I meant.  It was very hard for me to take pictures of 3D object especially in a small space that I have.

I really like how the bouquets turned out but I was a little concerned  that Eileen might not like it.  I delivered to her the other day and as soon as she opened the door and saw the bouquets she loved them!  and of course I was very happy.

Can you picture that money bouquet for up coming Valentine's Day and Mother's Day? Oh, I can't wait to make them! That is how my brain is working.  Always thinking.......about what to create next but for everything else I take it one day at a time.  :)

Thank you so much for visiting and for your lovely comments.  Wishing you all a Happy Holiday!

Helen

Wednesday, December 21, 2011

Turquoise Quilling Jewelry Set

Hello,

Someone requested me to make this turquoise quilling jewelry set.


I would never have made the set in this color myself.  I really like how they turned.  So I'll be making more of these set in different colors.

AnythingChallenge
Everybody Art Challenge
Make It Monday


Helen

Monday, December 19, 2011

Baby Onesies


Good Morning Blogger Friends!

I had wanted to make the baby onesie and I finally made one.  To be exact I made two baby onesies.

I didn't know any graphic design so I hand drew the template.  It look simple but it took me  two hours of drawing and cutting. I made this white and yellow one first.  I didn't like the sleeves.  They are two small.  I cut only 1" for the sleeves.

The part that took me so long was the curve part at the bottom and the neck.  Then I made another one, brown and pink,  and I adjusted the sleeves to 1 1/4 inches.  I like this one better.

Thanks for looking.

Helen

Friday, December 16, 2011

Dollar Bill Rose Tutorial


Hello,

I love playing with money, who won't, right? :)  I made the dollar bill roses years ago but I haven't share it on my blog.  I was thinking of sharing it  last Mother's Day but  I never got a chance.

So here is my chance,  I had an order from Eileen to make three money bouquets for Christmas.  Isn't that interesting!

Here is the tutorial

For each rose, you will need 3 to 5 new dollar bills.  Accordion fold each bill.The folds are about 1/4 inch.  See second photo.


Then tie the bills like shown. I used the wire that can be found in the produce section to tie the bills first.  Then I used the floral wire for the stem.  I used 5 bills so I have fuller roses.

Tip: See I tie the bills not evenly.  DON'T DO THAT! just arrange the bills evenly.

Then carefully open the bills and then shape them into petals.
As you can see in  the picture, I fold the inside petals half way down so all the petals are the same high. I like it that way. Keep play around with the petals until you like the way your rose look.  I used the bamboo stick, the smaller one, to curl the petals.

Here are the finished roses.

I made only 27 roses out of the $375 that Eileen gave me.  Now I need to assemble them into bouquets.  I'll share them with you when I am done.  Any question feel free to email me or leave me a comment here.


Have a wonderful weekend!

Helen

Wednesday, December 14, 2011

4 Years Old Quiling Frame

Hello,

Today I wanted to share this quilling frame made by my 4 years old daughter.  She assembled the wooden frame at the Home Depot with the help from my husband.  If you have small children and looking for free thing to do on weekend,  the Home Depot has free kid clinic on the first Saturday of every month.   And Lowe Home improvement  also has free kid workshops twice a month.  The workshop is on the second and the third Saturday of the month.

With the paper threader that I got not too long ago, I cut her some quilling strips.  I tried to show her how to use the circle sizers but it was difficult for her.  I thought the imperfection on the flower petals added an interesting effect to it.  I didn't help her with the quilling at all. 

She made the three flowers with the stem and the leaves first then she glued them onto the frame.  She added the four corners later. It took her a few days to do this quiling. The last corner I guested she got tired of it and never finish it.  She wanted to sell her frame at the craft show.   She didn't realize that her frame is priceless to her mom. :)

Until next time!


Helen

Monday, December 12, 2011

I Am Back!


Hello Blogger Friends!

Phew! I finally finished with the craft shows for this season!   I couldn't believe myself. I did 8 craft shows in 8 weeks.  I had one craft show a week since October, 24. The first show was very disappointed.  I sold only half of the amount that I sold last year.  There were not much traffic due to lack of advertizing.

Then I went to my second show at a hospital (Riddle Hospital) the following week.  I was hopping for a better turn out.  At first, it was another disappointed show.  However,  I had a customer (Sue) whom I email after the show to thanks her for stopping by my booth and Sue placed an order from me and that sort of made up a little but it still wasn't a good show.  I won't return to that hospital again.  The ladies who organized the show didn't care a dime about us.  She didn't advertize for us. Sue happened to walk by us after her doctor appointment.  The hospital employees didn't know about us selling there.   So there were not much traffic.  When there was no traffic, there wasn't going to be any sale.

I am not going to bore you with the rest of the craft shows.  Out of the 8 shows that I did, 5 of them were not a good shows.  The other three shows turned out great!  Thanks to the staffs at the volunteer office  at  Crozer hospital for allowing me to sale my crafts there.  My 20%  donation were well worth it!  If you are curious what I meant by that is, a vendor needs to give 20% of her total sale to the hospital at the end of the day and this apply to any hospital.  

My last two shows were December, 8 and December, 9.  I know it was insane to do two shows in two days.  I had almost nothing to sale for the last show.  It was at a Catholic school. It was the Secret Santa workshop. The items for sale cannot exceeded $5.  So  I had to drop my price down for some items and for the last minute items and I really meant last minute.  I went shopping for the fleece and the chocolates right after I came home from the craft show that I did at the hospital.  Then  I stayed up until 1 AM to make them.

I made 36 of these for the secret Santa work shop.


Isn't he cute!

I got the image from here.  On her blog it said free but I couldn't get the image for free so I paid a small fee and got to download the image right away.  Well worth it!  You can find the video tutorial here.

It was lots of work  preparing  items for the craft shows and I didn't make any profit from it but I had load of fun meeting others crafters and many compliments about my work. I was asked this question from the people who stopped by my booth.

Questions and compliments                 My answers
"did you make all these?"                     Yes, I made everything on the table.
"Did you sleep?"                                 Yes, I did but not a lot.
 All the patience you had!            Only with these crafts because they didn't talk back to me. hehehe.....
 Your work are so beautiful!!!!        Thank you!!!!

I would do this all over again! Who won't, right!

Have a marvelous Monday!

Helen


Monday, December 5, 2011

Barbars Blog Candy


Hello,

I don't have my creation to share today. My camera is acting up so I couldn't take any pictures.  Any way, my friend Barbara at Barbara's World of whimcees have an awesome blog candy.  Don't take my words for it.  Goes check it out yourself.


Have a wonderful the rest of the week!

Helen

Tuesday, November 29, 2011

Quilled Snowflake Earrings


Hello Bloggers!

Today I have two pairs of quilled snowflake earrings to share.
The paper strips that I used for these earrings had two sides.  A touch of silver on one side and plain white on the other side.


I am adding these to my Etsy shop.


Thank you for stopping by again today. 

Helen


Monday, November 21, 2011

My New Toy - Mini Paper Shredder


Hello Bloggers!

I'm back again. I am so excited to share with you my new toy. I first saw this hand powered mini paper shredder at Lin Handmade greeting card.  I knew I got to have one and I finally bought it.   I absolutely love it! I don't know why I didn't order it sooner.  I would have saved  lots of money on quilling strips.  I guessed it cost to learn. I highly recommended if you are enjoying quilling.  It cut about 1/8 inch strips which are perfect for quilling.


Now I can have any color of quilling strips I want.  Think of the $$$ that I will be saving from cutting my own quilling strips and that means more new toys for me, yay!

  I tried cutting different types of paper and double sides pattern papers were the best.

Here are a few snowflakes that I had made using the strips that I cut from my new toy.


I love the ridge  (is that the correct word for it) from the blade.  It added  nice texture to the snowflakes.  These snowflakes were made from 65 lb. card stock.  When the card stock ran through the shredder, it got softened and that made it easier to roll the strips.

I bought this mini paper shredder from here.  The price was reasonable and  it offered  free shipping.  Check it out if you had been cutting your own quilling strips.  This little thing could save you lots of times and no the company didn't pay me anything for this little promotion.


Thank you for looking!  Wishing everyone who celebrate Thanksgiving a Very Happy one!

Until next time!

Helen

Monday, November 14, 2011

Elegant Altered Quilling Frame

Hello Bloggers!

  I haven't forgotten about you my blogger friends.  I just don't have time to spare.  Between 3 young kids, their school work, house work, my part time job,  and my craft shows, I have no time left to browse the web. So bare with me I will visit you wonderful blogs when I am done with my craft shows.  I only have a few  more to do. :)

Here is today sharing.


Please excuse the not so good photo.  I haven't take a single decent photo lately. I don't know if it was me or I need a new camera.

I'm entering this to

Make it Monday

Thanks for looking.  Have a fantastic week!


Monday, November 7, 2011

Lots Of Kusudamas


Hello Bloggers!

I am still around. I haven't fall off blog land yet.  I took time off from blogging because I was busy making these


Here are more


And here are five more that I am working on


I made about 20 of them.

Here is how I assembled them. I folded all the pieces that I need.  Then I glued each piece and I used paper clips to hold the piece together.


After the glue dried, about 5 - 10 minutes, I took them  off the paper clip and pushed them open and glued 2 pieces together like shown

I waited until the glue dried, then I glued that 2 pieces together
I waited again until the glue dried then I glued the last piece in to make the petal or whatever you called that 5 petals piece.


Although the petals looked the same, but they were not.  Once the glue is completely dried, I took the 12 petals and tried to fit them together like a puzzle.

They are beautiful but my favorite are the white and the purple one.

I'm entering this to

Make it Monday

Creative Inspirations Paint

Catch The Bug


Thanks for checking in with me.  I am going to be off again.

Helen


Wednesday, October 26, 2011

TopNote Flower Boxes

Good Morning Blogger Friends!

You knew I love boxes and with all the flowers that I had been making I thought I will use them to decorated some boxes.


Thanks for looking! Have a wonderful day.  I will return to posting again next Monday.

Helen

Monday, October 24, 2011

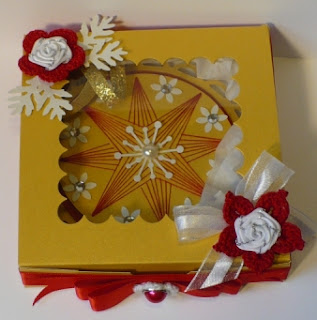
String Art Ornaments and Matching Boxes


Hello Bloggers!

I am sharing a few of the string art ornaments that I put together last week.  If you are my regular blog reader, you knew I had about 100 of these string art already made over the Summer and just waiting for me to put them together into something.  And the holiday season is not too far away so I thought I put a few of them into ornaments.  The ornaments look the same on both sides and I am into matching set lately so I made each ornament a matching box.  I was thinking of making a matching card to go with the ornament but I didn't have time so may be next time.


I was very happy with the result and I especially happy with the boxes.  Each box used just one 8 1/2 x 11 card stock.  I will share the measurement of the box another time.

I had a few of these ornaments on my Esty shop or if you are interested in purchasing the one that is not in my Esty shop email me.  I tried the ornaments on a Christmas tree and they looked so nice!  This picture didn't tell much.


I am entering this to

Make It Monday
Inspire me Friday

Thanks for stopping by.


Helen